page one
[The Ctrl-J shortcut for duplicating a layer or selection
contents to a new layer is disabled in Elements 2. Use Layer >
New > Layer via Copy instead.]
If you apply Element’s or Photoshop’s filters (they’re the same)
to an image, particularly a portrait, you often end up with a
muddy mess. Reducing the filter’s effect by applying it to a duplicate
layer and lowering that layer’s opacity can sometimes be even
worse. Instead of looking filtered, your image ends up looking
like it is poor quality or defective.
Please note that most of the Elements
and Photoshop filters can only be applied to images which are
in RGB color mode. To check and/or change your image color mode,
choose Image > Mode.
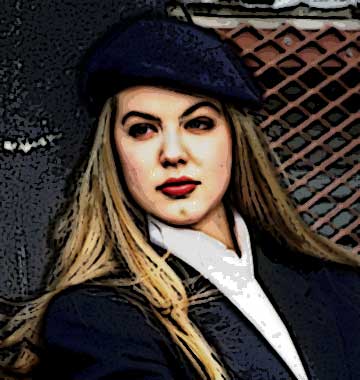
The method I will describe below
is useful for turning an image of a specific person (“Bob”) into
a generic illustration (“a man”). It is also useful, as demonstrated
in the second example I’ll use, for creating stylized portraits
which still retain the identity of the subject.
By separating the important image
details onto another layer you can filter the underlying layer
and then blend the unfiltered details. The procedure I use for
doing this is very simple. Note that you can use a layer mask
instead of the technique I describe, but it is actually harder
that way. I’ll show you why at the very end.
Please note that the images of people
used in this tutorial are from a collection of free samples from
Corel. They are not intended for your use. The last image (of
a flower) is mine, and you are welcome to use that one.
Start by opening your image in Elements
or Photoshop. I am assuming you will have only the background
layer to start with. If you have several layers in your image,
make a flattened copy to work with. The image I’ll use first is
shown below.
Create a duplicate of your background
layer by dragging it onto the New Layer icon at the bottom of
the Layers palette,
or by choosing Duplicate Layer from the Layers palette menu. Access
the menu by clicking on the little arrow in the upper right corner
of the palette.

Next, click on the New Layer button
at the bottom of the Layers palette, or choose Layer > New
> Layer to create a new, empty layer directly above your duplicate
background layer.
Double-click on the new layer in
the Layers palette (Photoshop 6 users, press Alt as you double-click)
and name this layer Black Outline.
Click on your image a few times
with the zoom
tool to zoom in enough that you can see details clearly.
Press D on your keyboard to set
your foreground-background
colors to the default black and white. Select the paintbrush tool
in the toolbox. In the paintbrush tool’s options bar, make sure
Opacity is set to 100 %.
Pick a soft brush from the options bar’s pop-up palette.
Make sure the new, empty Black Outline layer is selected in the
Layers palette and then paint on an edge in your image (see the
second image below for an example).
If the brush is too fat or thin,
use Undo to remove the line, and then press the left bracket key
[ to make your brush smaller. The right bracket key ] will make
your brush larger. You want to cover the edges with black but
don’t want to cover any more than you need to.

original, unfiltered image

black outline on separate layer
Paint over all important edges and details in your image. As
a rule, you want to outline only, not fill, though I always fill
in the eyes and mouth.
Please note that you can use any
color you like to create this outline. The only thing that matters
is that the brush opacity be set to 100 %. So, if you are
outlining on a black image, use white as your outline color. The
color makes no difference. You can use multiple colors if you
like.
Here’s what you layers palette should
look like so far.

When you have the black outline
complete, Ctrl-click on the Black Outline layer’s name in the
Layers palette.
This will select all of the non-transparent content (the outline).
With the selection outline active,
click on the background copy layer to select it in the Layers
palette (it will show as dark blue when selected) and press Ctrl-J,
or choose Layer > New > Layer via Copy.
A copy of the outlined image areas
will be created on a new layer directly above the background copy
layer. Double-click (Photoshop 6 users, Alt-double-click) on the
layer and name it Colored Image Outline.
Turn off visibility for the Black
Outline layer by clicking on the eyeball icon at the left end
of its layer.
Click on the background copy layer
again to select it. Then choose Filter > Artistic > Poster
Edges. Click OK to apply the filter with the default settings.
For simplicity, I have used the default settings for all filters
(except one which is noted) applied in this tutorial.
After filtering is complete (it
may take a minute, depending on the size of your image file),
click on the Colored Image Outline layer and change its blend
mode to Multiply.

At this point, your Layers palette
should look like this. Remember to keep the Black Outline layer’s
visibility turned off (note the grayed out box where the eyeball
icon would be).
Below, first, you can see the image
with the Colored Image Outline layer’s visibility turned off.
This is what your image would look like if you simply filtered
the image without creating the outline as we did here.
Directly below that, you can see the filtered
image with the Colored Image Outline layer’s visibility turned
on.
This was a fairly moderate filter.
I’ll show you two more dramatic ones, next.
continue on page two

Poster Edges filter without outline layer
Poster Edges with Multiply
outline
continue on page two