The BACKGROUND tag allows
you to use an image for the background of your Web page. This is part of the
<BODY> tag, just like BGCOLOR in the earlier lesson. A special note
here: You can only have one opening <BODY> tag. Depending on the size of the
browser window, a large image may only appear once, but smaller images will be redrawn as
many times as necessary to fill a page, this is known as tiling.
<BODY BACKGROUND="imagename.gif"
BGCOLOR="#FFFFCC" TEXT="color">
Of course, we don't type imagename.gif.
You have to enter the file name of the image you want to use. Let's say you had an
image named flower.gif. You would enter flower.gif
between the ( " ") quotation marks and it would change
the background of the page to an image of a flower. Remember you have to upload
the image file to your server first! Then flowers will appear in your background
as many times as the browser window and the size of your image will allow. If it's a small image,
say, 20 by 20 pixels, and the page is being viewed in a
480 by 640 browser window, then flower would appear 768 times. Don't worry if you don't
understand about pixels and browser windows, if you got a little picture, you get a lot of
flowers.
Take care when choosing a background that it does not make the text unreadable. Too
dark a background with dark lettering, light background with light text or a background
that is just too busy can all be big problems!
It is a good idea to select a BGCOLOR to match the main color in the background graphic. This
will make your page background the correct color before the graphic loads, In case it doesn't load
your text will still be clearly visible. For instance, if you have a black background with white text,
and the black background doesn't load, it's impossible to read white text on a white background.
If you set the BGCOLOR as well, to black, then your text will always show.
Background Resources:
The Pixel Foundry
Designs for
background use.
http://www.pixelfoundry.com/
Backgrounds for Us
Another good archive of backgrounds.
http://www.ECNet.Net/users/gas52r0/Jay/backgrounds/back.htm
Okay, Here Comes the FUN Part!
Please choose one of the images below for a background. You will have to save the image
on your hard drive (Download) and then send it to File Manager
(Upload.)

|

|

|

|
|
Gray.gif
|
Pastel.gif
|
Brick.gif
|
Bisonbkgndlav.gif
|
If you are using Netscape: Place your mouse cursor over the image you
want to copy, click the right button on your mouse. You will see a list
of options, move your cursor down the list to: Save Image As..., push
your left mouse button. In Internet Explorer it is the
same procedure, except instead of Save Image As..., you have
"Save
Picture As."
You will get a little window asking you where you want to save this file. Let's save it
in the Windows/ Temp folder.
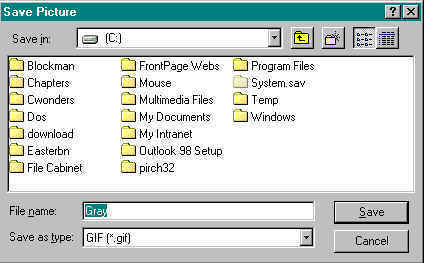
Near the top of this little window, it should say Save in.
You can determine what folder the image will be saved in here. Let's start at a common
point. If you have (C:) in the top box like the picture, you are almost
there. If not, click on the little folder with the up arrow to get to this point. Now
click on the Windows folder.
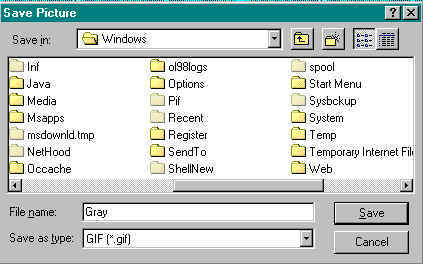
You should be to this point now. Now click on the Temp
folder. If you need to, you can use the little arrows or the slide bar to find the Temp
folder. After you open the Temp folder, press Save.
Remember the exact spelling of the file. Remember where you save files on your hard drive,
you will need the location to upload them.
Now we have the file on our hard drive. Let's go to File
Manager .
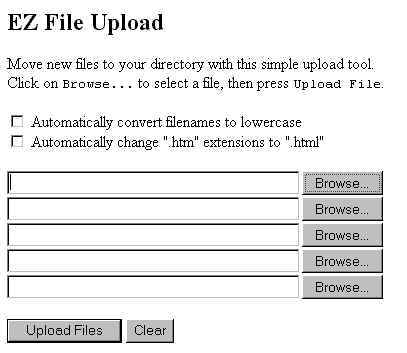
Once inside File Manager, find EZ File Upload. We
will use this to upload our file. I will use Gray.gif for
my example here, but you can use any of the backgrounds.
Click on the Browse button, you should see
that pop up window again.
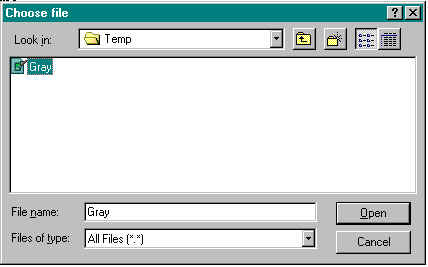
You need to find the location of the file on your hard drive. You should
be in the Windows folder. You should see little directional arrows on
either side of the window, use them to find the TEMP folder and double
click on it to open it. Find your file, in my case it would be Gray.gif, and click on it.
Now click on Open.
The name and location of your file should be automatically filled in the
EZ File Upload box. Now press Upload Files. EZ File
Upload will upload your file and tell you when it is done.
Now you know how to upload files. It wasn't that hard, now was it?


