
|
In Elements 1, the burn tool was hidden under the dodge tool in the toolbox. To find it, click
on the dodge tool icon (the one that looks like a black
lollipop) and hold the mouse button down. Choose the tool
you want from the pop-up menu. [The burn tool is out
on its own in Elements 2.]

The burn tool will darken the pixels dragged over according
to the percentage chosen in the tool’s options palette [see
below]. You can choose to darken highlights, midtones, or
shadows. Each must be worked on separately; the tool does
not work on all three at once.
To use the burn tool, select it in the toolbox, set your
options, and choose
a brush from the pop-up palette in the options bar,
and drag in the image to darken the chosen tones. This tool
has an effect on click, but does not do any additional work
until it’s moved. However, repeated stroking over the same
area does have a cumulative effect.
A shortcut for changing brush sizes while using this tool
is to press the left bracket [ to decrease brush size, and
the right bracket ] to choose a larger brush.
When editing an image with any tool that uses brushes,
you can right click on the image and the brushes pop-up
palette will appear right next to your cursor.
Note that these tools cannot be used on 1 bit Bitmap mode,
or Indexed color mode images.
The keyboard shortcut for the burn tool is now
the letter J (it used to be the letter O). You
can toggle to the dodge tool (which does the reverse of
the burn tool) by holding down the Alt key.
|
The illustration below, is the burn tool’s options bar.
To choose a brush size and type, click on the the brush thumbnail.
A pop-up palette of available brushes will appear. For more information
on brushes, please see the Brushes page.
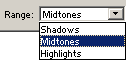
The box titled Range, and showing Midtones is a drop down
menu of the three tone areas you can work on, highlights, midtones,
or shadows. Image darkening (burning) will occur only in the tones
designated. Therefore, if shadows are chosen in this box, you
can drag the burn tool over light areas mixed with shadows, and
only the shadows will be made more dark. The light areas will
be unaffected.
On the right side of the bar is the Exposure box. The
setting entered here determines how fast darkening, or burning
of the image takes place. A high value will cause rapid darkening.
I like to use a very low value, 10 % or less, and stroke repeatedly
until I have the amount of darkening I want. Higher values will
often give you blotchy results. You want the effect to be subtle.

If you have doodled with a tool’s options and want to get back
to the default settings, click that tool’s icon at the far left
end of its options bar. Choose either Reset Tool to reset only
the current tool, or Reset All Tools to restore default settings
to every tool.
Please note that all descriptions, and illustrations featured
refer to files which are in Photoshop’s .psd format, and which
are in RGB color mode. Other file formats, and color modes may
generate different options. Some Photoshop features are not available
for images not in .psd format, or RGB color mode. To find what
color mode your image is in, choose Image > Mode.