The default brushes that appear in the pop-up palette
include a row of hard edged brushes at the top, followed
by two rows of soft edged brushes. A variety of different
brush shapes and sizes fill the rest of the palette. All
brushes show the pixel width of the brush at the bottom
of the thumbnail.
You can create your own brushes from existing brush tips
by editing the More Options settings for an existing brush.
Then choose New Brush from the pop-up palette menu (menu
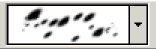
shown near the bottom of this page). Below you see the
stroke thumbnail of one of the default round brushes with
edited Spacing, Scatter, Angle and Roundness settings.
New brush tips can be created by selecting whatever it
is that you would like to make into a brush. The brush
tip is what you see in the thumbnail for that brush in
the brushes palette. A brush applies color according to
the brush tip’s luminosity. Therefore, any part of your
brush tip that is black will apply color at 100 %
opacity. Any gray areas in your brush tip will apply color
in proportion to the brightness of the gray tone; dark
gray applies more color while light gray applies less.
White areas within a defined brush tip are considered
transparent and apply no color at all.
In Elements 2, the selection boundary used to define
a new brush can be in any shape. Once you’ve made your
selection, choose Edit > Define Brush. You will then
get a dialog box asking you to name your new brush. Once
named, the new brush will appear in the current brushes
palette. However, it is best to save your custom brushes
in their own set. If you don’t save to a custom set, your
custom brushes will be lost if you load another brushes
palette or delete your preferences. To save a custom set,
choose Edit > Preset Manager. Choose Brushes from the
Preset Type menu, and then click and Shift-click to select
all the brushes you want to include in your set. Click
the Save Set button and name your custom set. After closing
and reopening Elements, your set will appear in the brushes
pop-up palette menu.
Keyboard shortcuts for brushes include the bracket keys
for cycling through all available brushes. The left bracket
[ will move you to the next smaller size, and the right
bracket ] will move you up one size. In Elements 2, these
keyboard shortcuts for increasing and decreasing size
work on all brushes, not just the default round
ones. Holding down the Shift key while pressing the left
bracket will decrease brush (edge) softness. Shift plus
the right bracket increases softness. This shortcut does
not work on most of the non-round brush; hardness cannot
be altered even via More Options for most of the more
complicated brushes.
When editing an image with any tool that uses brushes,
you can right-click on the image and the brushes pop-up
palette will appear next to your cursor. You can then
use the arrow keys to navigate to the brush that you want,
or click on a brush to select it (as usual).
To close the brushes pop-up palette, press Enter, or
click on your document’s blue title bar, or just start
painting.
Be sure and set your brush cursor preference in Display
& Cursors preferences. Find them at Edit > Preferences
> Display & Cursors. If you have chosen “brush
size”, you can toggle to “precise” by pressing Caps Lock.
If you have your preference set to “precise”, Caps Lock
will toggle to “brush size”. A preference of “standard”
will go to “precise” when Caps Lock is pressed.
If you look for the old Brush Dynamics button at the
far right end of the options bar, it’s gone. Those options
have been moved into the More Options pop-up palette.
There is now only one Fade setting instead of three.
If you’re looking for the airbrush tool, it’s also gone.
It has been relegated to a button on the brush tool’s
options bar. Use the airbrush option to allow continued
application and build-up of color (color pooling) even
when you are not moving the cursor.

|


