If you want to use a consistent group of colors in a picture
you are working on, you can store them in the Swatches palette
and reuse them as needed. Sets of colors can be saved, and
reloaded for use in other images by using the Preset Manager
found by choosing Edit > Preset Manager, clicking and
Shift-clicking to choose swatches to save in your set, and
then choosing Save Set.
To add a swatch to the Swatches palette, you can use the
eyedropper, or the Color picker to select a foreground color.
Then click on an empty area in the Swatches palette, and
that color will appear as a new swatch.
If you want to replace an existing swatch with the new
color, hold down Shift and click on that swatch. The new
color will replace the old. In all cases, when you are in
position to add a swatch, the cursor will turn into the
paint bucket.

To select a swatch as the foreground color, click on the
swatch. To select a swatch as the background color, hold
down the Ctrl key and click on the swatch. [Note that in
Elements 1, you hold down the Alt key select a bacground
color.]
If you want to delete a swatch, hold down Alt and click
on that swatch. The cursor will turn into a pair of scissors
when you do this. [Note that in Elements 1, you hold down
the Ctrl key to delete; for some reason, they've reversed
these two shortcuts in version 2.]
If you want to return to the default collection of swatches,
choose Reset Swatches from the palette menu, shown below.
The swatches you have chosen are saved in the preferences
file when you exit the program.
Please note that palettes which are in the palette well
will not stay open while you edit. To bring a palette out
of the well, click on its name tab and drag it out.
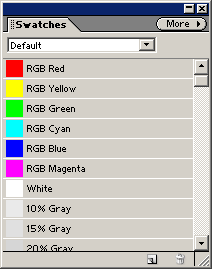
The illustration below left shows the Swatches palette
in List View. Choose either List or Thumbnail view from
the palette menu, accessed by clicking the More button in
the upper right corner.
To the right you see the selection of alternate
palettes from which you can choose, with the exception of
the CorrectGraySwatches palette, which is my own. I added
that because the gray percentage swatches that ship with
Elements 2 are not correct. Check them
with the color picker (click the Brightness radio button).
Note that Brightness percentages are the inverse of gray
percentages.
If you save your own, custom palettes by using the Preset
Manager, they will be listed in this menu. You have to close
and restart Elements to see your custom palettes listed
here as mine is.
To display any palette which is not currently on the screen,
choose Window > Show [palette name]. To close a palette,
click the X in its upper right corner. You can group palettes
under a shared blue bar by dragging the name tab of one
under the blue bar of another.
To hide all palettes and the toolbar, press the Tab key.
To hide the palettes, but leave the toolbar in view, hold
down the Shift key while pressing the Tab key. Pressing
the Tab key again will bring them all back. This can be
a big help if the palettes are overlapping an image you
are trying to work on
|