
|
|
6.3 COLOR BALANCE AND TIME OF DAY | ||
 Learn
To Draw Learn
To Draw |
Learn
To Paint |
Photoshop
Elements |
Animation
Menu |
Art
Principles |
Art
Appreciation |
In photography, there is a color of light called "daylight." However, this type of light occurs only at a specific time of day. Over the course of the day, the light can change from a warm red at sunset, to a cold blue at noon, and then back to a warm red or orange at sunset. "Daylight" on the color temperature scale is really set for midday sun between 10 A.M. and 2 P.M. During these hours, colors appear clear, bright, and accurately rendered in the photo.
Before and after midday, light from the sun is modified by the extra distance it travels through the Earths atmosphere. Some of the blue light is filtered out, leaving the light with a more reddish cast than at midday. This is easily seen very early or late in the day when the light is often quite red-orange in tone. The change in color will affect your pictures strongly, but this reddish cast is a wonderful light to photograph in.
 |
Just before dawn and at dusk, colors often appear muted or monochromatic. During these hours when light is relatively dim, you often have to use an extra-long exposure time. |
 |
Midday light on a sunny day will produce colors that appear natural and accurately rendered. |
 |
Early morning and late afternoon light outdoors will produce a warmer, more reddish color balance than you will get at midday. |
Sunsets and sunrises are relatively easy to expose because the exposure is not as critical as it is with some other scenes. If you underexpose the scene slightly, the colors will simply be a bit richer and darker. Slight overexposure will make the same scene slightly lighter.
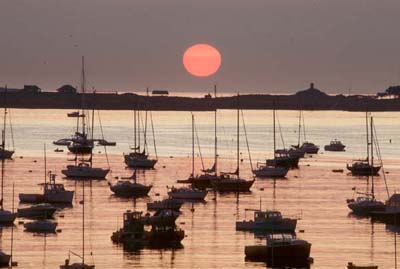 |
The sun often takes on a flattened appearance as it rises above the horizon. When partially obscured and softened by a haze, its warm, red glow illuminates the foreground. |
 |
Sunrises and sunsets by themselves arent very interesting. Its objects in the foreground, such as the skyline, or unusual atmospheric effects such as this dark cloud that give them some punch. |
The colors in the sky are often richest in the half hour before the sun rises and the half hour after it sets. It pays to be patient as you watch the sky change during these periods. For one thing, the sun itself is below the horizon and not in the image so exposure problems are greatly reduced. Also, clouds in the sky often light up dramatically and in some cases, reflect the light to other clouds until you find yourself under a wonderful canopy of reflected color.
Every sunrise and sunset is unique and the variations can be truly amazing. Its certainly not true that "if youve seen one sunrise or sunset, youve seen them all." If you want the sun in the photo, its best if it is softened and partly obscured by a mist or haze. If it rises as a hot white or yellow ball, find another subject, or turn around and photograph the scene its illuminating.
 |
With the bright disk of the sun included in a sunset or sunrise, your picture may come out somewhat underexposed and darker than you expected it to be. Add 1 or 2 stops of exposure to a sunset or sunrise that includes the disk of the sun. |
Its tempting to take all of your photos of a rising or setting sun, but it often pays to turn around. The rich, warm light changes the colors of everything it hits. This is a magic time to capture images that will really stand out. Colors take on a warm, soft glow that cant be found at any other time of the day.
 |
Instead of shooting into the sun at sunrise or sunset, shoot with it behind you to capture rich, warm colors of scenes bathed in the suns light. |
 |
A long-focal-length lens will enlarge the disk of the sun so that it becomes a more important part of the picture. Foreground objects silhouetted against the bright sky, can also add interest. |
 |
Here the camera was positioned so the rising sun was behind one of the grain elevators and wouldnt burn out the image with its glare. |
| Anticipating the Sun and
Moon When planning to integrate the sun or moon into an image it helps to know when it rises or sets. With the moon, it also helps to anticipate the phase. This information is available in almanacs, and also on the Web at the U.S. Naval Observatory (http://aa.usno.navy.mil/AA/data/). You can view the phase of the Moon at http://tycho.usno.navy.mil/vphase.html. |
The moon, especially when full, adds a lot to an image. The best time to capture the moon is when its near the horizon. Because it is close to foreground objects at that time, it looks much larger than when its higher in the sky.
Keep in mind that the moon is relatively dim and usually requires long exposures. Since its moving relative to the Earth, longer exposures can actually blur it, giving it an oblong shape. To reduce the chances of this happening, shoot just before sunrise or just after sunset when there is still some light in the atmosphere from the recently set sun. (It bends around the Earths curvature due to refraction in the atmosphere.)
 |
The rising full moon, and the trail it leaves across the water, adds a lot to this photo of an old-fashioned coal-burning power plant on Salem Harbor. |
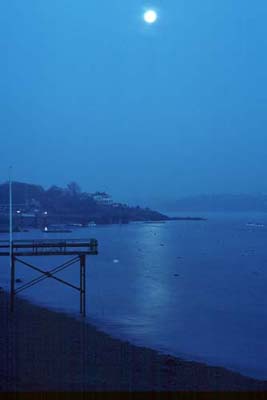 |
Long exposures on bright moonlit nights can be very attractive. Just keep in mind that the moon does move so exposures longer than a minute or so may show it elongated. |